Wooden Ships & Iron Men - Advanced Rules
If you want to read the Simplified rules click here, the Basic rules click here, or read the Introductory guide if you are new to the game or need some clarification.
INTRODUCTION
Wooden Ships & Iron Men is a tactical simulation of naval warfare during
the great age of sail. The game covers the period from 1776 to 1814 when the
great square sail ships-of-the-line dominated the oceans and the speedy and
durable American frigates gave world recognition to their young parent navy.
The game is played by two or more players each commanding a ship, squadron,
or whole fleet! Scenarios depict the famous naval engagements of the American
and French Revolutions and the Napoleonic Wars.
The Advanced version is based on the advanced game rules for the Avalon Hill boardgame Wooden Ships & Iron Men. If you are familiar with the boardgame, optional rules and "build your own scenario" are not implemented. Other differences are outlined below.
DIFFERENCES BETWEEN THE BASIC VERSION AND THE ADVANCED VERSION
The basic movement, combat and boarding party/melee mechanics are the same, but the Advanced version adds several rules not found in the Basic version:
- Repairs: Hull, rigging and gun hits can be repaired under certain conditions.
- Full sails: Allows more movement at the cost of double rigging hits.
- Backing sails: Ships can pause movement to avoid collisions (but lose those movement points).
- Ammunition types: Grape shot, chain shot and doubleshot are now avalable.
- Anchoring: Anchors provide a hit table bonus, but can be lost in battle and limit movement.
- Updated movement window: Several new controls have been added to accomodate the advanced options above.
- Limited fields of fire: Ships are no longer required to fire at the nearest enemy. Instead, a broadside's guns are divided into bow and stern sections which have different fields of fire, allowing one section to fire if the other can't (or has a worse shot).
- Critical hits: If the game "rolls" a 6 for damage, there is a chance of a critical hit which can mean more damage or other ill effects. Critical hits are noted in the game's event log.
- Exploding and sinking: When a ship surrenders by striking the colors (hull is destroyed), there is a chance it will sink (rolls a 5) or explode (rolls a 6). A subsequent 6 means it sinks or explodes at that point. Sinking ships have a solid blue surrender flag while exploding ships' flags are red. Exploding ships do damage to all adjacent ships (even friendly ones) on rigging table 10.
- Advanced game tables: This link is also available in each game. On the hit determination table, the numbers in parentheses are for rakes. So "2(4)" means use table 2 for a normal hit, 4 for a rake. Note there is a separate bonus for stern rakes which is applied in addition to the number in parentheses. Also, the hit tables only go up to 10, but it's possible for a broadside to go higher. In this case one roll is made on table 10 and a second roll is made on the difference. So a hit table of 12 will roll on tables 10 and 2. Separate entries are made in the log, so it can appear as if the ship fired twice.
- Wind change: Every three turns the wind might change direction and intensity. Some wind speeds reduce the movement allowance of ships and prevent the use of full sails. If it advances to a hurricane, the game ends.
- Movement restrictions: Any ship that didn't move forward on the previous turn (not counting drifting) loses one point of turning allowance and must move forward before it can turn, although it can turn in place without moving forward. Note that for a ship-of-the-line 1 (the biggest ships), which only have a turning allowance of one, they cannot move and turn if they didn't move forward the previous turn. They can either move forward (only) or turn, but not both. Like the Basic version, turning restrictions on dismasted ships still apply.
- Larger ships: For most scenarios, ships have 50% more hull squares and crews are doubled. Guns are also doubled, but divided into bow and stern sections. Rigging is the same. Note the preview links when creating a new game don't reflect the Advanced settings.
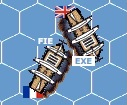
- New rake criteria: In addition to the Basic rules rake determination, a rake is also scored if the firing ship occupies the hex directly in front of the bow or directly behind the stern even if the enemy ship can return fire. In the example below, Exeter is raking Fier even though Fier can return fire.
DIFFERENCES BETWEEN THE ADVANCED VERSION AND THE BOARDGAME
While YouPlay has always tried to follow the original boardgame rules, some differences are necessary for online playability or technical reasons.
- Can't pick target: The game automatically picks the target to fire at from among eligible candidates
based on the highest Hit Determination Table (HDT). If multiple targets have the same HDT, it picks one randomly. Unless circumstances change, it will always pick the same target.
- Collisions: The winner of a collision always occupies the hex (in the boardgame in some cases the winner could choose to occupy the hex or let the enemy occupy it).
- Different broadside targets: Rigging or hull can only be picked per ship, not per broadside. So if both broadsides fire, they both must fire at either rigging or hull.
- Anchoring: Fully anchored ships don't drift. Ships anchored by bow or stern drift normally.
- Fields of fire: There are house rules for limited fields of fire for bow and stern guns.
- Exploding/sinking ships: When a ship surrenders by striking the colors, there's a chance it will sink or explode as outlined above. The boardgame says that can only happen in subsequent turns, but it's possible a ship will explode or sink the same turn it surrenders.
- Winds of change: On the "wind direction change table," if a 1 is rolled it's supposed to change the wind back to its original direction. This has been changed to a 2 (no change), meaning fewer radical wind changes.
- British use of chain shot: The boardgame rules say the British can never fire chain shot. On YouPlay, it's based on the initial nationality of the ship. So if the British capture an enemy ship, chain shot is available. Likewise, if a British ship is captured, chain shot is not available.
- Grappling friendly ships: The boardgame rules say grappling friendly ships is automatic. Here a die roll is still made. It's even possible to ungrapple the attempt if one of the ships doesn't specify grappling a friendly ship. Note this applies to the Basic version also.
Repairs |
|
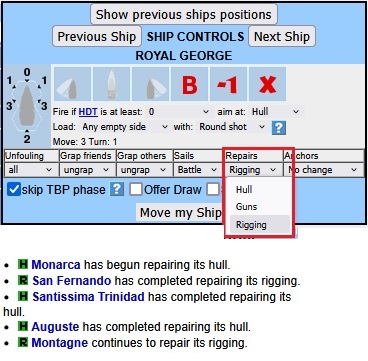
Ships can repair damage to the hull, guns or rigging via a new pulldown on the movement input window if it has at least two crew sections. It does not need a full second crew section - one crew square in that section will do. Captured ships can be repaired if they have two prize crew sections.
For every three turns spent repairing, two squares of that component will be restored. The three turns do not have to be consecutive - the game will keep track of previous repair turns and pick back up at that point when it's eligible. There is no limit to repairs - given enough time, a ship can fully repair any component.
A ship can only perform repairs if it does nothing or moves only straight ahead. Pretty much everything else interrupts repairs for that turn:
- loading a broadside
- firing
- turning (including anchored ships turning on springs)
- raising or lowering full sails
- dropping or raising the anchor
- engaging in melee (transfers on or off the ship don't interrupt repairs as long as two crew sections remain after all transfers)
- being involved in a collision
Since it also includes loading a broadside, it can take a turn or two for a ship to initiate repairs just due to loading, which can't be stopped. Repairs are noted in the turn log on the left, so check there to see if your ship has started repairs yet.
A ship can raise its minimum hit table to prevent firing and force repairs, but can still take damage from enemy fire (which might offset or exceed any repairs).
|
|
Full sails |
|
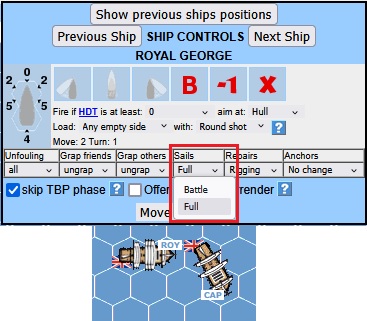
Full sails give ships more movement points. Generally, they allow two more points in attitudes A and B (see the general introduction for an explanation of wind attitudes) and one extra in attitude C (against the wind but not facing directly into it).
Full sails are only available when a ship has not lost a rigging section. A ship on full sails suffers double rigging hits regardless of whether the target was rigging or hull (rigging hits can result from a hull shot). If a ship on full sails loses its entire first rigging section, it is automatically reverted to battle sails. This is noted in the event log. Subsequent attempts to raise full sails will fail until enough rigging is repaired.
A ship is considered to be on full sails or battle sails the turn after it is ordered. So if a ship is on full sails but is ordered to battle sails, enemy ships will still fire at the full sails during the current turn.
To raise full sails, a ship must have moved at least one hex forward on the previous turn or move forward this turn. However, a ship which did not move forward last turn can only move forward to raise full sails. It cannot move and turn (or just turn) and raise full sails in the current turn. A ship can order battle sails at any time.
Full sails are represented by extra sails on the ship icon. To the right, Royal George is on full sails while Captain is not.
|
|
Backing sails |
|
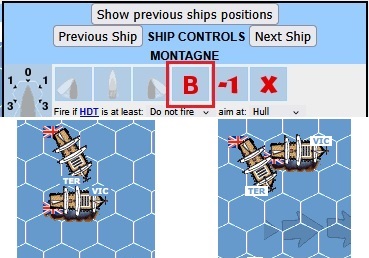
A ship can delay movement by using backing sails, the red "B" on the movement window. This is usually done to avoid a collision while another ship moves in front of it. Backing sails can be used more than once per turn (if it has enough movement) and at any point in the movement plot, but each one uses up a movement point.
The game displays the "ghost ship" outline over the ship. There is no count of how many times you've used it, so if you lose count, simply cancel the whole move and start over.
In the example to the right, Terrible will hit Victory if it moves forward normally. By using backing sails as its first movement point, it can avoid the collision and still move. In the second image, Terrible ordered "B" + forward + forward.
|
|
Ammunition types |
|
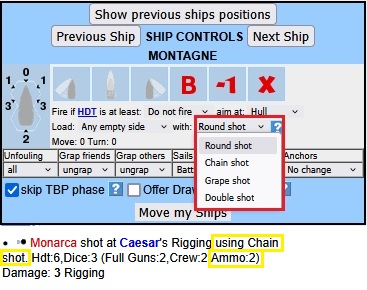
New types of shot are now available. Each has hit table adjustments and severe range limitations as explained below (also see the advanced tables). Initial broadsides are always packed with round shot. You can force a change (see below) but lose the initial broadside bonus because the ship has to fire out the round shot to load something else.
Note the ammunition range table says carronades have a range of 3 hexes. It is actually 2 hexes.
The use of advanced ammo is noted in the log. The ship's status shows what is currently loaded.
To force an ammo type, set it with the pulldown list and specify the port or starboard broadside. This also works with round shot since it's possible for an advanced ammo type to be ordered only to have the intended target move out of range. Using this procedure you can start firing again.
- Chain shot is used against rigging. The maximum range is 3 hexes. Since it lacks the penetrating power of round shot, hull and guns hits are ignored, but a hit table bonus is given. The British cannot use chain shot, though it is available on captured ships.
- Grape shot is effective only against enemy crews. The maximum range is 1 hex. Grape shot damage is calculated differently from regular damage. The hit table is calculated normally (with a hefty penalty), but rather than a die roll determining damage, the calculated hit table determines the number of crew squares eliminated. So if the penalty pushes the hit table too low, it won't kill any crew. Even for lower hit table numbers, it might be better to fire a normal shot since it could produce other damage along with crew hits.
- Doubleshot is exactly what it sounds like - double-packed round shot. The maximum range is 1 hex. Doubleshot gives a modest hit table bonus, but at the cost of taking two turns to load so it's often better to take two regular shots, especially if the target can move out of range.
|
|
Anchoring |
|
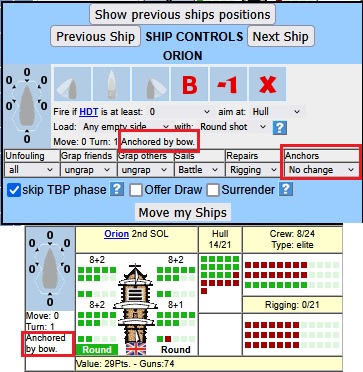
A new pulldown on the ship movement window allows you to drop or weigh (raise) the anchor (if it hasn't been lost). Anchoring takes effect the turn after it is ordered, so a ship can move normally and drop anchors in the same turn.
Anchored ships receive a hit table bonus due to enhanced stability, but cannot move forward. The only difference between full anchoring (the "Anchor" option) and bow or stern anchoring is that a fully anchored ship does not drift and cannot be turned.
Bow and stern anchoring used a system of cables attached to the anchor that allowed the ship to rotate around its bow or stern at the cost of not firing that turn. This is also called anchoring by springs. A ship can turn two hexsides this way as opposed to the usual one hex at a time.
Note the boardgame rules are silent on anchored ships drifting. Since most of the original scenarios did not include anchoring at all, and it seemed like an oversight in the rules, YouPlay compromised on bow/stern anchored ships drifting normally while fully anchored ones do not.
Up-anchoring takes two turns during which the ship cannot fire. It can't be stopped once started. On the second turn, the ship can turn (even if fully anchored), but cannot move forward yet.
An anchored ship can also cut the anchors which allows it to move normally the next turn, but the anchor is permenently lost. A critical hit can also sever the anchor cable.
A ship's anchor status is shown on the movement window and the status box (see image to the right).
|
|
Bow and stern guns' limited fields of fire |
|
In the Simplified and Basic versions, the entire broadside either fires or not. The Advanced game splits each broadside into bow and stern sections which can fire independently if the other cannot or a better shot is available. A ship can never fire at two different targets with one broadside (though both broadsides can still fire). If only one section fires an initial broadside, the bonus is lost for the other section.
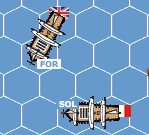
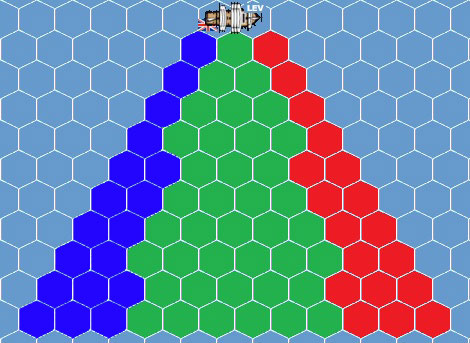
The zones are shown to the right. The green hexes are the full broadside zone. The red hexes are the bow-only zone while the blue hexes are the stern-only zone. A target ship that straddles zones (in a green hex and a red/blue one) is considered to be in the full broadside zone. If a target ship is angled so its bow and stern are at different ranges, it uses the closer range. Both of these are illustrated below. Solitaire's bow is 2 hexes away from Formidable, but her stern is 3 hexes away, so it will use a range of 2 to calculate the shot. Also, Solitaire's bow is in Formidable's bow-only zone, but her stern is in the full broadside zone. Therefore, it will use Formidable's full broadside to calculate the shot. Note both also apply to Solitaire.
While the game handles this automatically, it's useful to have some idea of what it might pick as a target. In general, it will pick the highest hit table among eligible candidates. To be a target candidate, a ship must still be the closest (or equally distant) ship in that zone, including friendly and surrendered ships. A bow-only shot can be farther away than a stern-only shot (and vice versa) if the hit table is higher, but it can't shoot at another ship that's farther away in either zone. If a ship is in the full guns zone, other ships which are farther away in any zone are not eligible candidates.
If two or more ships are equally distant and generate the same hit table, the game picks one randomly. Once that determination is made, it continues firing on that same ship until circumstances change (another ship drifts or moves closer or farther away, a rake becomes available or unavailable, the target surrenders, etc.)
|
|
Examples of limited fields of fire
 |
 |
 |
 |
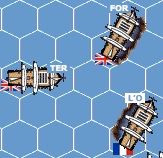
| One of the tactics suggested in the Basic version Newbies' Guide is the "rakeless corner" where two ships can form a corner so neither of them can be raked unless an enemy ship moves between them. That's no longer always the case. Here Formidable and Terrible have formed a rakeless corner, but since Formidable is in L'Orient's bow-only zone, that leaves Terrible as a possible target for her stern guns. With the rake bonus, L'Orient shot at Terrible in this example even though she's farther away. |
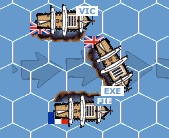
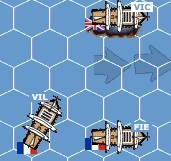
Exeter is closer to Victory, but only in the bow-only zone and therefore blocks Victory's bow guns. Since Fier is the closest ship in the stern guns zone, she is a valid target for Victory's stern guns. Note that Fier can only fire at Exeter because Exeter is the closest ship in both zones. Since she straddles Fier's bow-only and full broadside zones, she can be targetted with a full broadside at range 1. |
Although Fier is still within the play of Victory's full broadside, so is Exeter. Since a friendly ship is closer to both Victory's bow and stern sections, she cannot fire.
|
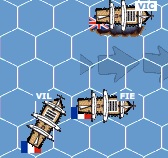
Here, Victory has a choice to make. Since Fier and Ville de Paris are equidistant, it comes down to the hit table calculation. In this case, the full broadside against Fier was higher than a stern guns rake against Ville.
|
 |
 |
 |
 |
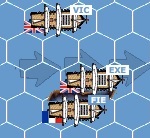
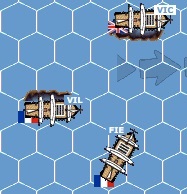
| This one is trickier. Since Ville is (only) in the stern guns zone and closer than Fier, a full broadside against Fier is not possible because for that to happen, both sections have to target the closest ship, meaning only Victory's bow guns can target Fier. In this case, the rake against Ville wins out on the hit table, but if Victory's stern guns section was weaker, it's possible Fier could have been targetted (by the bow guns only). |
This is a similar situation, but the roles are reversed. Again, Fier cannot be targetted by a full broadside since Ville is still closer to Victory's stern guns. In this case, the closer stern guns against Ville or a farther away bow guns rake against Fier result in the same hit table and Ville was randomly chosen as the target. |
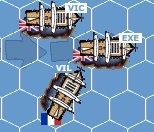
Exeter is closer to Victory's bow guns, therefore Victory cannot fire them, but can fire her stern guns at Ville. Likewise, Ville can fire her bow guns at Victory. Note that Victory could have fired a full broadside if Exeter wasn't in the way, but Ville could still fire just her bow guns since Victory is in the bow-only zone. |
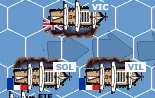
Flip a coin! Both Ville and Solitaire are eligible for full broadsides from Victory because both straddle a bow-only or stern-only zone. The game will choose one randomly and continue with that choice until circumstance change as described above.
|
 |
 |
 |
 |
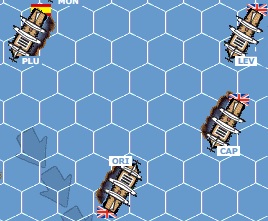
| Pluton cannot fire at Captain at all because Leviathan is closer to her stern guns and Orion is closer to her bow guns, but she can fire at either Leviathan or Orion (with only stern or bow guns). Captain can fire a full broadside at Pluton because she is the closest ship, is in the full broadside zone and no friendlies are in the way. |
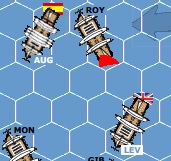
In this example, neither Leviathan nor Auguste can fire at the other. Auguste can't fire because Royal George is in her full broadside zone, so neither section can fire at a ship farther away. Leviathan can't fire because Royal George is closer to her stern guns and Montagne is closer to her bow guns. |
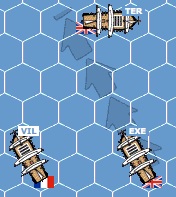
Exeter is within Ville's full broadside zone, but Terrible is only in her bow guns zone and farther away. Since Exeter is closer to Ville's bow (and stern) guns, Ville can only fire at Exeter (with a full broadside). |
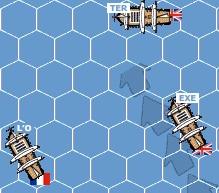
Exeter straddles L'Orient's stern-only and full broadside zones, making it eligible for a full broadside. Terrible is also in L'Orient's full broadside zone, but her stern is farther away than Exeter, meaning the stern guns cannot target Terrible, but the bow guns can. So again it will come down to the highest hit table: a full broadside non-rake versus a bow guns rake. |
Tactical considerations
- Use full sails sparingly. If a ship isn't moving at full sails speeds, but is in range of enemy ships, there's no reason to pay the cost of double rigging hits.
- Move instead of drifting. Due to the turning restrictions on ships which don't move forward the previous turn, move the ship if it's going to drift forward anyway. This gives you more flexibility during the next turn, including the option of turning then moving or raising full sails.
- Don't forget the new rake rule. Look for rake opportunities or deny them to the enemy.
- Don't forget backing sails. If two or more ships are plotted to occupy the same hex during the same movement point, they will collide. Use backing sails to prevent costly collisions with other ships.
- Beware of exploding ships. When they blow up, they do damage on table 10, so put at least one hex between your ships and the floating bomb if you can (and don't forget it might drift!). If not, at least lower full sails. If you're stuck and can't get away (and the wind direction makes it feasible), drop full anchors and hope the bomb drifts away before you're hit.
- Check a ship's anchor status. If it's fully anchored, it can't move, turn or drift. If it's anchored by the bow or stern, it can't move (but will drift) and if it turns it can't fire. Use this to your advantage.
- Don't be too quick to anchor. With all the movement restrictions, check the environment first. If you're in a crowded area of the battle or the enemy's ships still have most of their sails, it's usually better to not anchor and maintain your mobility. Keep in mind up-anchoring takes two full turns and cutting the anchors is permanent. Finally, you can use full anchoring to let other ships drift closer (or farther away).
- Beware of advanced ammo types. If you're on full sails and approach within chain shot range (3 hexes), you might be losing a rigging section or two. And check what an enemy ship has loaded. If it loaded doubleshot, the range is 1 hex, so stay at least 2 hexes away and it can't fire. Same for grape shot (1 hex) and chain shot (3 hexes). Be especially aware of grape shot as it comes with severe penalties. Check the hit table and make sure it will do any good before using it. If you're not firing, it might be due to the enemy being out of range, so force a switch to round shot as outlined in the "Ammunition types" section above.
- Pay attention to repairs. The game starts with rigging as the default repair, but switch to hull or guns as needed. If it's maxed out on one thing, switch to SOMEthing useful. In some cases, it's helpful to set the hit table higher so the ship won't fire and will work on repairs instead. Also, since just about everything interrupts repairs (firing, turning, anchoring, etc) do as much as you can in one turn to limit the interruptions. For example, turn and raise full sails at the same time. Finally, in the other versions it's usually better to advance closer to the enemy by sidestepping. Since turns interrupt repairs, it's worth considering moving straight against the wind so you can repair and move simultaneously.
CREDITS
This page was created by Longneck.
|


 Donate
 Leagues
 Gonzaga
 Blue Max
 Cartagena
 Wooden Ships...
 King Me!
 VampiRing